Jupyter
Connect from PC
Downloading the CCB Jupyter script
-
Open this link: https://datashare.molbiol.ox.ac.uk/public/files/jupyter.bat
-
Press
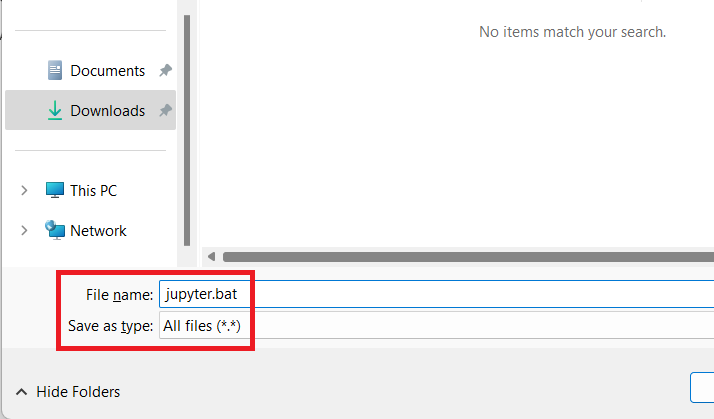
Control + Sto open the Save dialogue -
Change
Save as type:toAll files (*.*) -
Under
File name, delete the text. Do not skip this step. Replace with new namejupyter.bat -
Press
Save -
Use
File Explorerto find the file you just saved. It should look like this , with a small gear icon.
 -
But if it looks like this
 , with a text document icon then you have skipped step 4 or done the steps out of order, and you'll need to delete the file and start again.
Using the CCB Jupyter script
-
Double-click the file to run it.
-
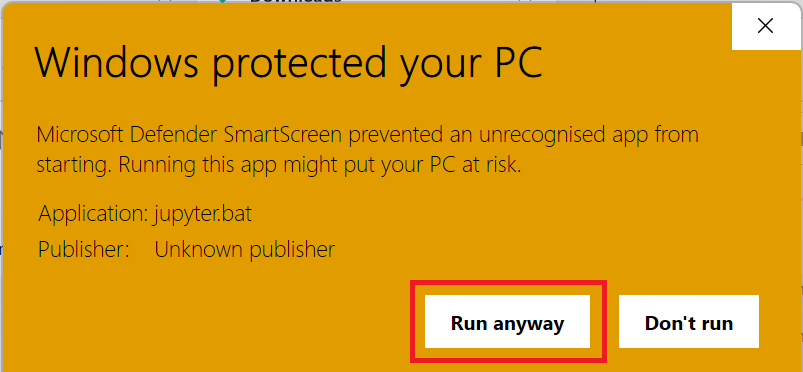
The first time you run the script you may get a warning from Windows Defender Smart Screen. If you do, click
More infoand thenRun anyway: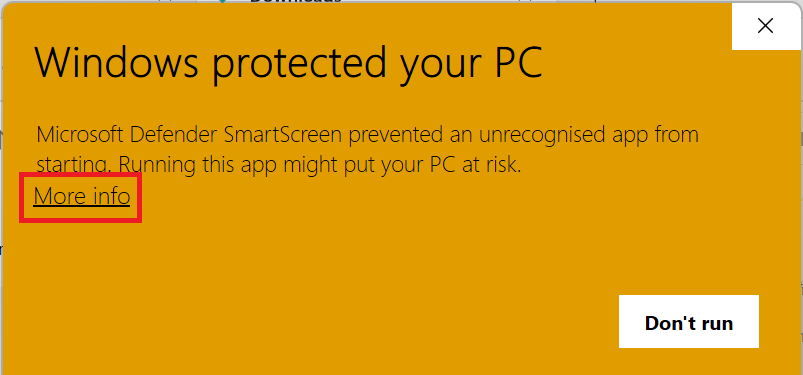
-
A black window will briefly flash on the screen as the program downloads the latest version, and then a command prompt will appear.
-
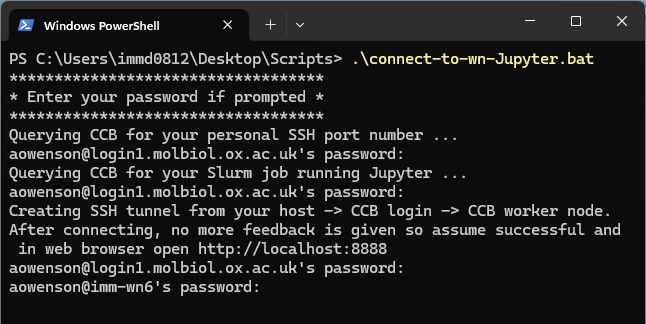
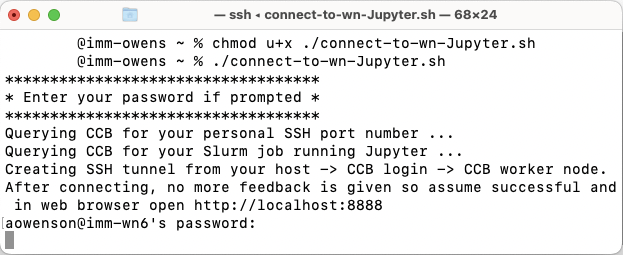
The first time you run the script you'll be prompted to enter your CCB username. Do this, and press Enter:

Mistype username? Delete or edit file
%LOCALAPPDATA%\ccb-jupyter\config.txt. -
The first time you'll also get a warning that the authenticity of the host can't be established. Type
yesand pressEnter:
-
Enter your CCB password (or your SSH key password if you have already set up SSH keys):

-
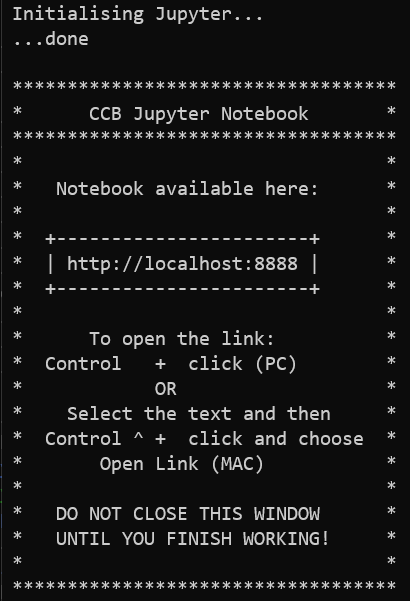
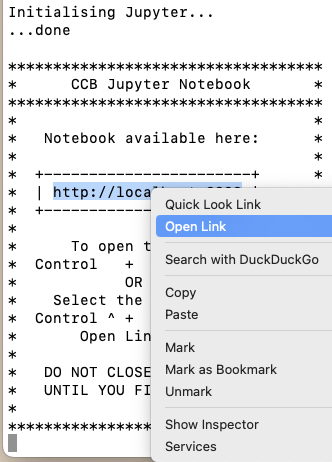
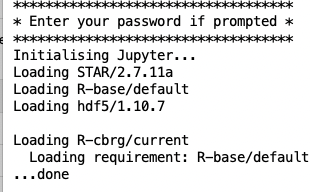
The message
Initialising Jupyter...will appear. When Jupyter is ready, the message... donewill appear, followed by instructions on how to open your notebook: -
Following the instructions, hold down Control and left click the link http://localhost:8888 to open your notebook in your default browser. If you want to use a different browser, you can cut and paste the URL.
-
Do not close the command prompt
-
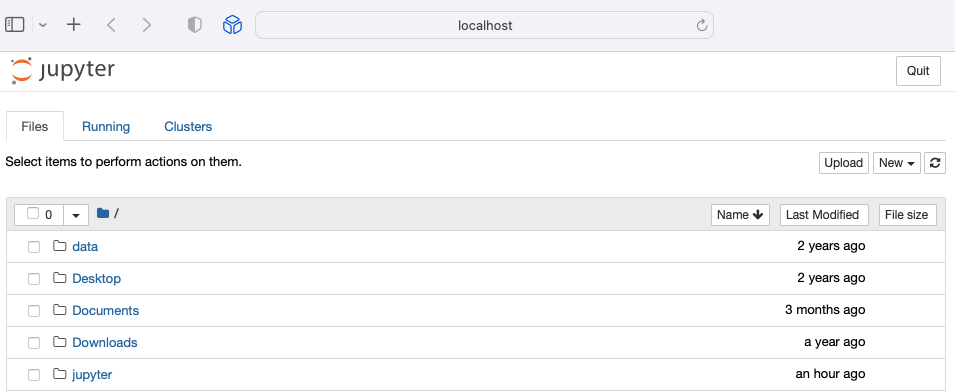
Switch to your browser to access your notebook:
Connect from MacOS
Downloading the script
-
Open this link: https://datashare.molbiol.ox.ac.uk/public/files/jupyter.command
-
Press
Command + Sto open the Save dialogue. -
Make sure your
Downloadsfolder is selected and pressSave. -
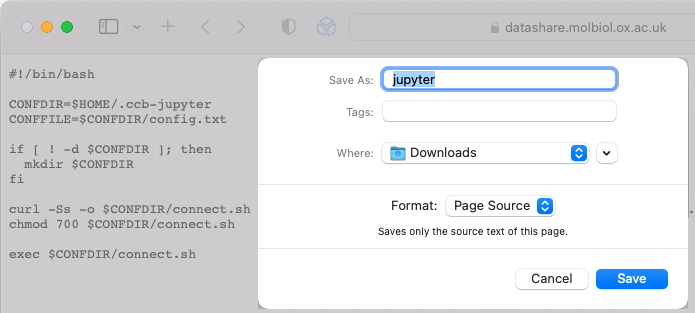
If a dialogue box appears asking to
Save Plain Text, chooseDon't append:
-
Open a terminal window (see Apple Terminal User Guide), then run these commands:
-
chmod +x $HOME/Downloads/jupyter.command
-
xattr -d com.apple.quarantine $HOME/Downloads/jupyter.command
-
Close the terminal window
Using the CCB Jupyter script
-
The first time you run the script, you will need to
Control + clickit and chooseOpen: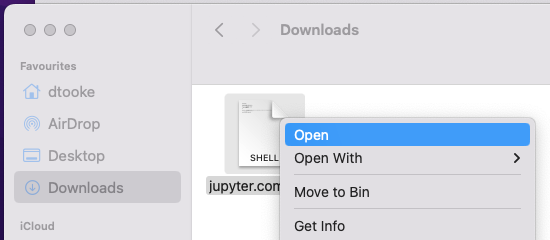
-
If you see this warning dialogue for
jupyter.command, clickOpen: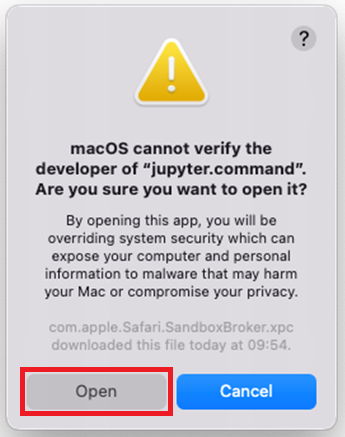
-
The first time you run the script you'll be asked to enter your CCB username. Do this then press Enter:

Mistype username? Delete or edit file
~/.ccb-jupyter/config.txt. -
The first time you run the script you'll get a warning that the authenticity of the host can't be established. Type
yesand press Enter: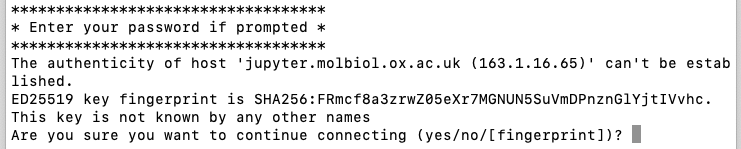
-
Enter your CCB password (or your SSH key password if you have already set up SSH keys):

-
The message
Initialising Jupyter...will appear. When Jupyter is ready, the message...donewill appear, followed by instructions on how to open your notebook: -
Following the instructions, select the link with your mouse/trackpad,
Control + clickit, and chooseOpen Linkto open your notebook in your default browser. If you want to use a different browser, you can copy and paste the URL: -
Do not close the command prompt
-
Switch to your browser to access your notebook:
Closing your Jupyter session
-
When you're finished, close the browser window. Do not use the
Quitoption in your Jupyter session unless you want to end it completely. Then close the command window. -
From this point on, you can follow the steps above to run the script and log in again. Your Jupyter session will be running where you left off (unless you chose
Quitas described above).
If your Juputer session becomes unresponsive, then trigger terminating all your processes on our RStudio / Jupyter Notebook server:
- SSH into your CCB account
- run command
touch ~/.kill_my_R_session - wait up to 2 minutes for that file to disappear
Loading CCB modules
Jupyter Notebook looks in a specific file for extra modules to load: $HOME/jupyter/ccb.modules.
This is a simple list of modules e.g.
STAR
R-cbrg
You can manage this file in either SSH login or in Jupyter:
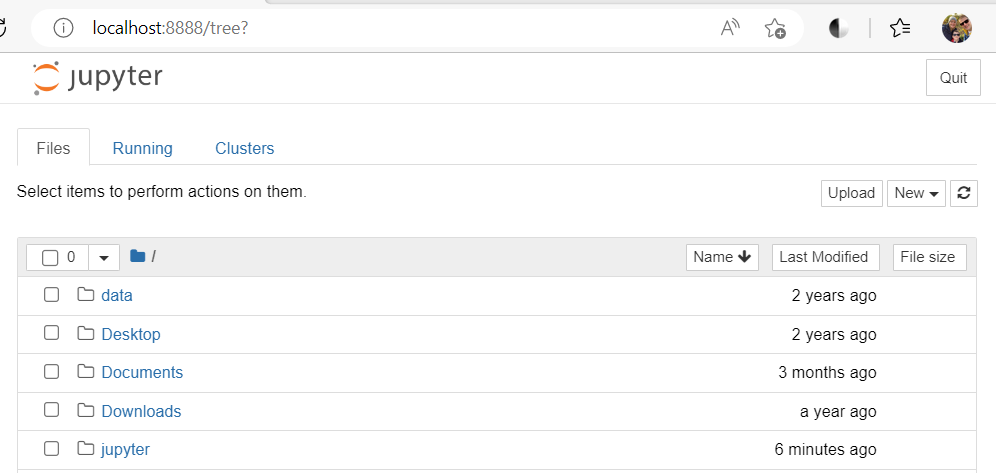
- Open your Jupyter session as normal, then click on the
jupyterfolder to open it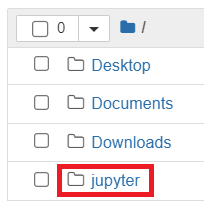
- Click
New>Text File: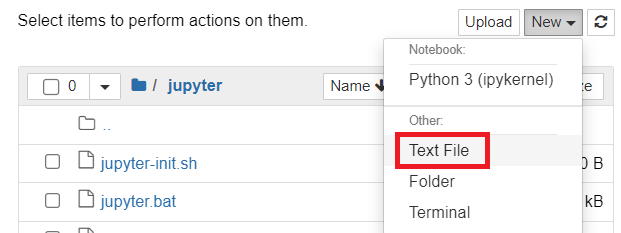
-
At the top of the screen, click
untitled.txt: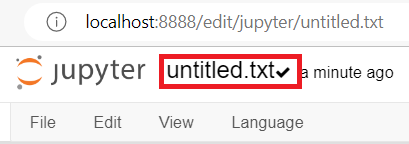
-
Name the file
ccb.modulesand press OK:
-
Add the modules you want to load one per line. For this example, I’ll use
STARandR-cbrg: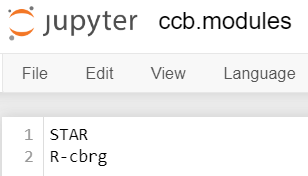
-
Choose
File>Save:
-
Close the tab. Back in the main Jupyter tab, choose
Quit: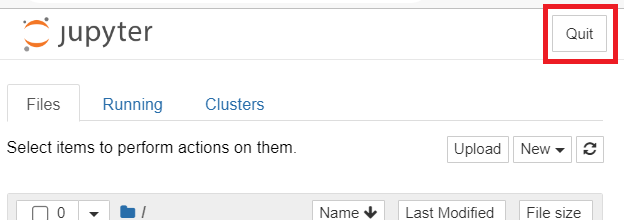
-
Close the tab.
-
Close the command prompt, then open Jupyter again using the script as normal.
-
Your new modules are automatically loaded:
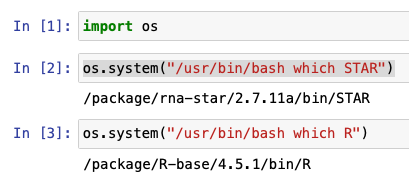
Your modules are now available for use within Jupyter.
We can verify this from a notebook using the os.system command:
Changing working directory
By default, Jupyter has been basing your session at $HOME, but eventually you will want to work within specific project folders.
To change Jupyter Notebook to a project folder requires simple command-line configuration:
-
Close Jupyter Notebook if open.
-
Edit the text file named:
$HOME/.jupyter/jupyter_notebook_config.py. Note that the folder.jupyterhas prefix., this means it is hidden in GUIs like Jupyter, hence using this command-line method to edit.
-
Enter these two lines into file, where 2nd is the folder path of your choice:
c = get_config()
c.NotebookApp.notebook_dir = '/project/sysadmin/aowenson/JupyterFolder'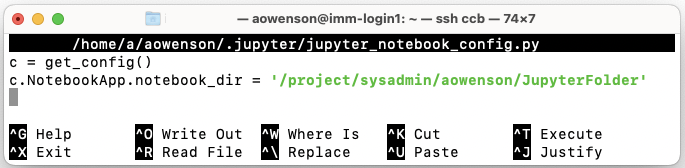
-
Save file (if using
Nanotext editor:Ctrl+X->Y->Enter). Then launch Jupyter as normal. You should be greeted with the contents of your folder:

Loading your venv
Python venv allows you to create isolated reproducible environments for Python packages. Follow this short guide to create your venv environments outside Jupyter
To make available inside Jupyter, just create a kernel file - example:
~/.local/share/jupyter/kernels/biopython/kernel.json
{
"display_name": "Python (biopython)",
"argv": [
"/home/a/aowenson/venvs/biopython/bin/python",
"-m", "ipykernel_launcher",
"-f", "{connection_file}"
],
"env": {
"PATH": "/home/a/aowenson/venvs/biopython/bin:${PATH}",
"PYTHONNOUSERSITE": "1",
"PYTHONPATH": "",
"VIRTUAL_ENV": "/home/a/aowenson/venvs/biopython"
}
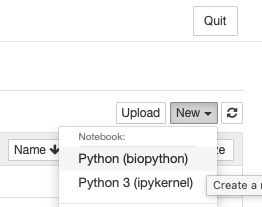
}Restart Jupyter to see in the `New` menu:
Slurm integration
Use our custom Jupyter magic tool ipy-slurm-exec to execute individual Notebook cells on our Slurm cluster.
Particularly useful for offloading to GPU.
Click for full documentation and guide.
Essentially it looks like:
Notebook setup
import ipy_slurm_exec
%load_ext ipy_slurm_exec
import torch
import numpy as np
seed = 123
vector = np.linspace(-2, 2, 256, dtype=np.float32)
torch.manual_seed(seed)
Notebook cell offload to GPU
%%slurm_exec --partition=gpu --gpus=1 --time=00:10:00
x = torch.from_numpy(vector).to(torch.device("cuda"))
y = torch.tanh(x @ x.T)
torch_result = y.sum().item()
Return to Notebook
print(torch_result)Click for full documentation and guide.
Integrative Genomics Viewer (IGV)
Using IGV's Python package igv-notebook, you can launch IGV in Jupyter Notebook:
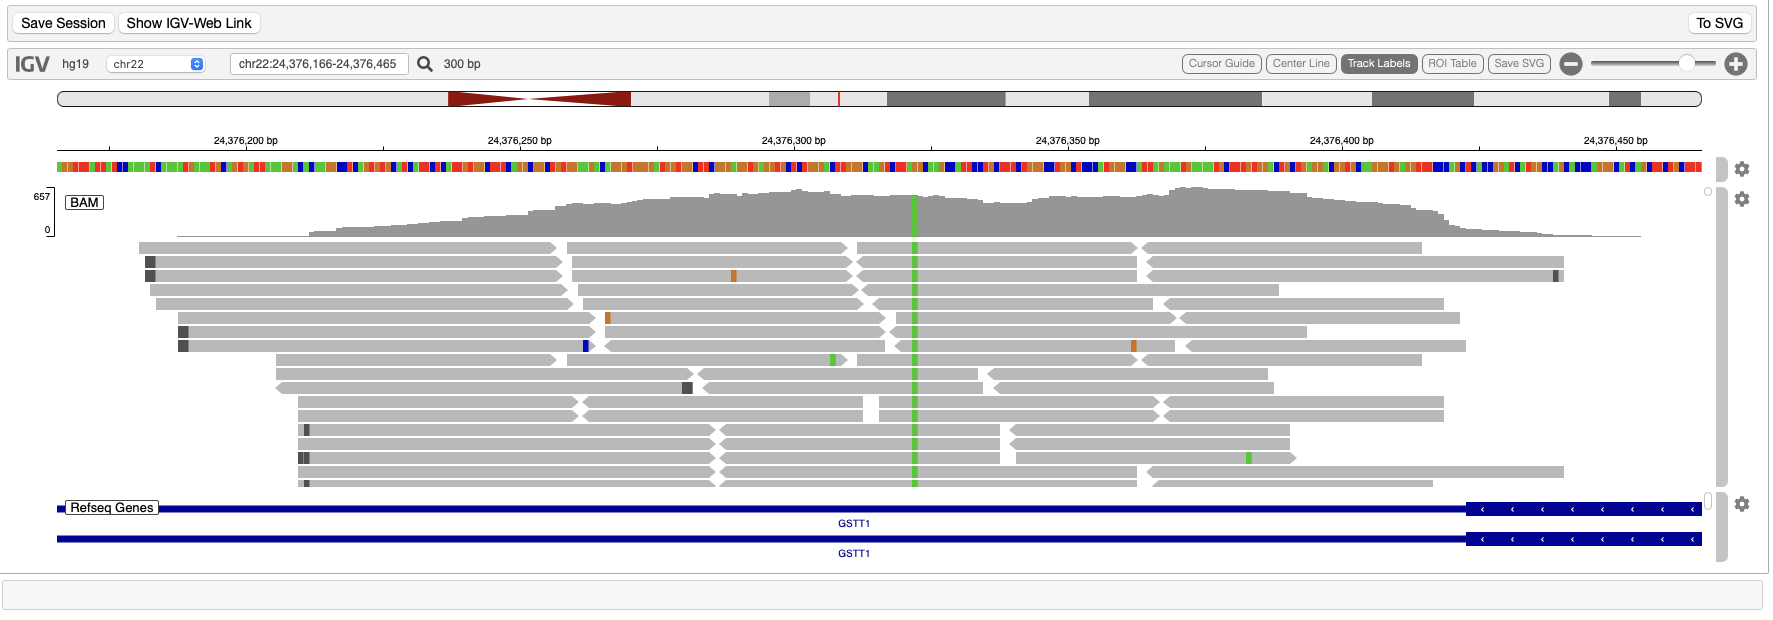
IGV provide an example using URLs. To load data from files on cluster instead, you must add tracks and ROIs individually after creating the IGV browser:
# Allow IGV to use full browser width:
from IPython.display import display, HTML
display(HTML("<style>.container { width:100% !important; }</style>"))

# Launch IGV on their demo data
import igv_notebook
igv_notebook.init()
b= igv_notebook.Browser({
    "genome": "hg19",
    "locus": "chr22:24,376,166-24,376,456"})
b.load_track({
    "name": "BAM",
    "path": "/databank/IGV-demo/gstt1_sample.bam",
    "indexPath": "/databank/IGV-demo/gstt1_sample.bam.bai",
    "format": "bam",
    "type": "alignment"})
b.load_roi({
    "name": "ROI set 1",
    "path": "/databank/IGV-demo/roi_bed_1.bed",
    "indexed": False,
    "color": "rgba(94,255,1,0.25)"})
Important performance note: the core IGV tool is implemented in Javascript, so this runs in your web browser. This means all genome data is sent over network to your browser, so can be slow for large genomes.
Troubleshooting
Disconnected?
-
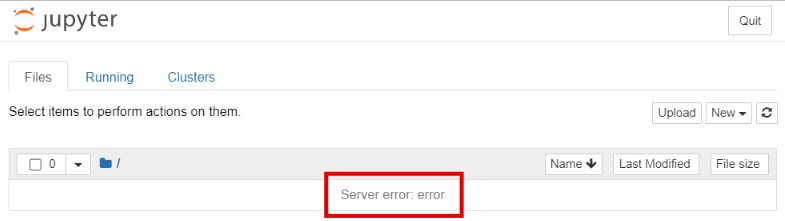
If at some point you become disconnected from the server, perhaps due to Wi-Fi or VPN issues, your notebook will become unresponsive and, after a short period of time, change to something like this:
Check the log
Your Jupyter process writes its console output to a log file in your home folder:
$ less ~/jupyter/ccb.log
...
[I 16:59:17.527 NotebookApp] Jupyter Notebook 6.5.4 is running at:
[I 16:59:17.527 NotebookApp] http+unix://%2Fhome%2Fa%2Faowenson%2Fjupyter%2Fccb.sock/
...
If your Jupyter is not working as expect, check this log file for errors e.g.:
  ...
  File "/ceph/home/a/aowenson/.jupyter/jupyter_notebook_config.py", line 2
    c.NotebookApp.notebook_dir = ‘/project/sysadmin/aowenson/jupyter'
                                 ^
SyntaxError: invalid character '‘' (U+2018)
ccb.sock is already in use
sock = socket. A Linux socket is like a phone line. Your last Jupyter connection did not hang up properly, and you can only have one socket open so you cannot reconnect to Jupyter. Killing all your processes will solve:
touch ~/.kill_my_R_session
Advanced: quickstart
The Jupyter notebook is automatically managed by the server. The scripts are a wrapper around an SSH tunnel combined with some configuration management and an auto-updater. If you want to run your own tunnel, the command used by the script is:
ssh -T -L 8888:%CCB_HOME%/jupyter/ccb.sock %CCB_USER%@jupyter.molbiol.ox.ac.uk
where %CCB_HOME% must be the full path to your CCB home directory and %CCB_USER% is your CCB username.
Advanced: launching your own Jupyter application
Our prepared Jupyter service has deliberate limitations, particularly not allowing loading your Conda environments. To combine Jupyter Notebook with Conda, or to run other applications like Jupyter Lab, you will need to (i) create a Slurm batch job then (ii) create an SSH tunnel to the application. To help ease this process, we have prepared a script to create tunnel to your job, provided it:
-
has job name
jupyter-wn -
is binding Jupyter to file socket
$HOME/jupyter/ccb-wn.sock
Review our Slurm documentation, ensuring you are comfortable submitting jobs to the cluster and monitoring them. Then adapt the example Slurm job below to meet your requirements.
#!/bin/bash

#SBATCH -J jupyter-wn  # job name
#SBATCH --time=1:00:00  # 1 hour
#SBATCH --ntasks=4
#SBATCH --mem=10G
#SBATCH --partition=short

module load python-cbrg  # To use CCB's Jupyter
jupyter-notebook list | grep "ccb-wn.sock"
if [ $? -eq 1 ]; then
  # Not already running so safe to start Jupyter
  mkdir -p $HOME/jupyter
  echo "Starting notebook"
  jupyter-notebook -y --NotebookApp.password_required=false --NotebookApp.token="" --sock=$HOME/jupyter/ccb-wn.sock
fi
Once you have submitted your Slurm job to the queue, run the following script on your local computer to automatically create the SSH tunnel to your job:
-
Windows: https://datashare.molbiol.ox.ac.uk/public/files/connect-to-wn-Jupyter.bat
-
MacOS: https://datashare.molbiol.ox.ac.uk/public/files/connect-to-wn-Jupyter.sh
Consider inspecting this script to understand the process and customise.
Conda + Jupyter
Conda is not compatible with CCB's Python modules, so to use your Conda environment in Jupyter then you need to install Jupyter into it:
conda activate your-env
conda install notebook=6.5.4  # same version as CCB
conda install nb_conda_kernels
python -m ipykernel install --user --name=your-env --display-name='Conda (your-env)'
Then your Jupyter initialisation should look like:
conda activate your-env
jupyter notebook list | grep "ccb-wn.sock"
if [ $? -eq 1 ]; then
  # Not already running so safe to start Jupyter
  mkdir -p $HOME/jupyter
  echo "Starting notebook"
  jupyter notebook -y --NotebookApp.password_required=false --NotebookApp.token="" --sock="$HOME/jupyter/ccb-wn.sock"
fi