Running jobs on CCB cluster
Overview
Access to the shared CCB cluster is managed by Slurm workload manager. This has three advantages over the login nodes:
-
More memory. Cluster systems offer up to 2TB memory, permitting larger data sets. This can help with situations where your program is running out of memory, or you receive emails reporting too much memory used.
-
More parallel processing. You can run multiple instances of a program on different data sets, or different programs, or mix of both, all simultaneously.
-
Faster processing. Your program may be able to leverage the additional CPU cores to reduce processing time but this is application-dependent.
Slurm manages cluster access by putting jobs in a queue. A job defines a set of resource requirements, and a piece of work to run on those resources. These resources are: CPUs (or GPUs), memory, and time. If you have not specified these, then queue defaults are used which may be much greater than your work needs.
This queue is not simply first-in first-out - instead Slurm considers resource requirements and fair-share policy. When Slurm selects a job to run, it runs on any one of many servers called nodes. You get just the resources you asked for (CPUs and memory), and Slurm runs your job as if it were you, in the location you submitted the job from. With many nodes, then many jobs from many users can run simultaneously.
The Slurm queues
In order to help ensure that jobs of different sizes all get a fair chance to run on the cluster, JADE has 5 primary queues.
The 3 CPU queues are:
| Name | Max CPUs | Max memory | Default time | Max time |
|---|---|---|---|---|
test |
8 | 50 GB | 10 minutes | 10 minutes |
short |
120 | 1850 GB | 1 hour | 1 day |
long |
128 | 1900 GB | 1 hour | 1 week |
We also have 2 primary GPU queues.
If you do not have a GPU preference, you can use gpu queue.
|
Name |
Model |
Architecture |
Max Cards |
GPU Memory |
TFLOPS |
Max CPUs |
Max Memory |
Default time |
Max time |
|---|---|---|---|---|---|---|---|---|---|
|
|
NVIDIA Titan RTX |
Turing CUDA cc 7.5 |
4 |
24 GB /card |
32.6 FP16 |
40 |
250 GB |
1 hour |
1 day |
|
|
NVIDIA L40S |
Ada Lovelace CUDA cc 8.9 |
4 |
48 GB /card |
91.6 FP16 |
192 |
1900 GB |
1 hour |
1 day |
If your job requires more than the maximum time, then contact us directly to discuss your requirements so that we can balance your request with the needs of other users.
Query commands
sinfo
List each queue. https://slurm.schedmd.com/sinfo.html
$ sinfo
PARTITION  AVAIL  TIMELIMIT  NODES  STATE NODELIST
long          up 7-00:00:00      5    mix imm-wn[1-5]
short*        up 1-00:00:00      2    mix imm-wn[6-7]
test          up      10:00      2    mix imm-wn[6-7]
gpu           up 1-00:00:00      2    mix imm-gn[1-4]
gpu-turing    up 1-00:00:00      1    mix imm-gn1
gpu-ada       up 1-00:00:00      1    mix imm-gn[2-4]
sbusy
Our custom tool to give more detail on cluster resource availability:
$ sbusy
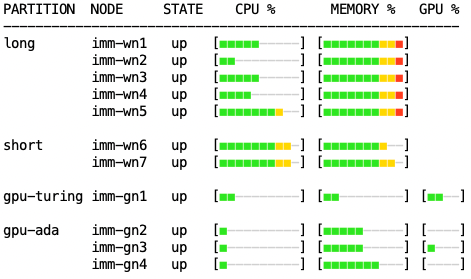
Red = fully allocated to jobs. Yellow = near-full. Green = good availability.
squeue
List your running or pending jobs. https://slurm.schedmd.com/squeue.html
$ squeue
  JOBID PARTITION     NAME     USER ST       TIME  NODES NODELIST(REASON)
xxxxxxx      long     mut5  xxxxxxx  R      11:22      1 imm-wn2
xxxxxxx      long     move  xxxxxxx  R      30:50      1 imm-wn3
xxxxxxx short,lon     mut3  xxxxxxx PD       0:00      1 (Resources)
xxxxxxx     short    mut12  xxxxxxx PD       0:00      1 (Priority)
Job state R = running, PD = pending.
The last column shows either the node the job is running on, or the reason it's waiting -
Resources means waiting for free resource, and Priority means waiting behind a higher-priority job.
sacct
Inspect all jobs particularly those that have ended, and see their status. https://slurm.schedmd.com/sacct.html
$ sacct -u `whoami` -S "now-1days" -E "now" -o "JobID,JobName,Start,Elapsed,State,Reason"
JobID           JobName               Start    Elapsed      State                 Reason
------------ ---------- ------------------- ---------- ---------- ----------------------
2785216      run_job.sh 2025-01-29T20:02:24   00:10:19  COMPLETED                   None
2785216.bat+      batch 2025-01-29T20:02:24   00:10:19  COMPLETED
2787951      web_summa+ 2025-01-30T12:30:02   00:00:03     FAILED                   None
2787951.bat+      batch 2025-01-30T12:30:02   00:00:03     FAILED
2788251      web_summa+ 2025-01-30T15:15:02   02:14:48    RUNNING                   None
2788251.bat+      batch 2025-01-30T15:15:02   02:14:48    RUNNING
2788252      web_summa+             Unknown   00:00:00    PENDING                   None
2788253      web_summa+             Unknown   00:00:00    PENDING                   None
View your failed jobs with -s argument:
$ sacct -u `whoami` -S "now-1days" -E "now" -s "F,NF,OOM,S,TO" -o "JobID,JobName,Start,Elapsed,State,Reason"
Scheduling
Job priority
We aim to apply a fair-use policy to the Slurm queue, in which everyone gets a share of the available cluster time.
-
If you currently have no jobs, your first job will have maximum priority 2500.
-
For each extra job you add to queue, its priority is decremented:
job priority = 2500 - quantity of older jobs
The general outcome is those submitting fewer jobs will have them start sooner compared to users submitting many jobs. But there are two important caveats:
-
Jobs that request fewer resources - CPUs, memory, time - will generally start sooner because easier to schedule, even if a lower priority.
-
We cannot guarantee when your job will start but can provide an estimate.
Job start time
Command squeue can print more columns via its --format argument, including scheduled start time for pending jobs:
$ squeue --format="%.8j|%i|%P|%Y|%S|%l|%r" | column -s'|' -t
NAME      JOBID    PARTITION   SCHEDNODES  START_TIME           TIME_LIMIT  REASON
mut5      xxxxxxx  long        (null)      2025-09-09T12:42:57  1-00:00:00  None
move      xxxxxxx  long        (null)      2025-09-09T12:23:29  1-00:00:00  None
mut3      xxxxxxx  short,long  imm-wn2     2025-09-09T13:35:59  1-00:00:00  Resources
mut12     xxxxxxx  short       (null)      N/A                  1-00:00:00  Priority
If start time is N/A, then job cannot be scheduled yet.
Consider start time as an approximation, because it changes as other jobs finish or are submitted:
-
your job can start sooner if a running job finishes early
-
your job can be delayed if a higher-priority job, or a smaller job, is submitted
To make typing that command easier, store it in a Bash alias:
$ alias q="squeue --format='%.8j|%i|%P|%Y|%S|%l|%r' | column -s'|' -t"
$ q
NAME      JOBID    PARTITION   SCHEDNODES  START_TIME           TIME_LIMIT  REASON
mut5      xxxxxxx  long        (null)      2025-09-09T12:42:57  1-00:00:00  None
...
Managing congestion
We have added custom traffic management to Slurm scheduling to ensure jobs are on the appropriate queue, and to allow a controlled number of short jobs to used spare resources in other queues. This means you may see your jobs running on a queue different to originally requested.
appropriate queuing
-
short-time jobs (< 1 day) on the long queue are moved to the short queue, where they should start sooner
-
jobs on GPU queues that did not specify number of GPUs are moved to short queue
spare resources
A controlled number of short-time jobs may use spare resources on other queues:
-
if the next long job start is >1 day in future, then short jobs may use spare resources in long queue
-
if
gpu-adaservers have spare resources after GPU reservations, then short CPU jobs may use it. We reserve 1TB memory and ~50 CPUs for GPUs, leaving a similar amount free. This is practical because thegpu-adaservers are very capable, similar to the systems in other queues (ignoring the GPUs of course).
Slurm Job script
Create
Each job that you want to run is described in a job script. This defines what resources to reserve for job, then what to do when it runs. For example:
-
I want: to run STAR on this data
-
Deliver it to: 4 CPUs and 10GB memory for 2 hours
The job script might look like this:
#!/bin/bash

# Resources:
#SBATCH --time=0-02:00:00  # DAYS-HOURS:MINUTES:SECONDS
#SBATCH --ntasks=1
#SBATCH --cpus-per-task=4
#SBATCH --mem=10G
#SBATCH --partition=short

# Environment:
#SBATCH --export=NONE

# Email when job completes or fails
#SBATCH --mail-type=END,FAIL

# What to run:
module load rna-star

STAR --genomeDir /databank/igenomes/Drosophila_melanogaster/UCSC/dm3/Sequence/STAR/ \
     --outSAMtype BAM SortedByCoordinate \
     --readFilesIn C1_R1_1.fq.gz C1_R1_2.fq.gz \
     --readFilesCommand zcat \
     --outSAMattributes All \
     --outFileNamePrefix C1_R1_ \
     --limitBAMsortRAM 7000000000 \
     --runThreadN 4
The top 5 lines tell Slurm what resources we think the job needs - time, CPU cores, memory, then which queue to submit to.
If these are not specified then Slurm uses default values.
Slurm will first look for default values in our system settings, such as queue times.
If not defined in system, then Slurm will use the defaults built into sbatch.
For more information on estimating the resource requirements of a job, please refer to profiling.
The 6th #SBATCH line overrides the default value of --export=ALL,
so that your current Bash environment is not exported to your job.
The 7th #SBATCH line, optional, sends you an email when specified job events occurred, in this case when job stops.
Other event triggers are available.
The remainder of script is just list of commands to run when the job starts.
Note that the backslash \ character is Bash's line continuation character, used to split long lines for legibility.
Requested resources are reserved for your running job regardless of what it actually uses, and Slurm only considers the requested resources in scheduling decisions, so think carefully what your requirements are and consider running a test job first to measure them. Requesting fewer resources will generally mean less time waiting in queue.
Ensure you regularly review your jobs resource efficiency
Submit
Basic job submission is with the command sbatch, so a simple minimal job submission could be just:
sbatch ./jobscript.sh
but you can also specify a partition (queue), number of nodes, and amount of memory (if not already in script) like so:
sbatch --partition=short --ntasks=1 --mem=10G ./jobscript.sh
Interactive job
There may be times when you really need to interactively run some code with access to more CPU and memory, for example when testing a new pipeline. You achieve this with the srun command:
srun --partition=short --cpus-per-task=4 --mem=32G --pty bash -i
Please note this reserves resources like a batch job, so avoid requesting more than necessary.
Further, interactive jobs are only permitted on the test, short and gpu queues.
Sessions left idle for extended periods will be terminated without notice.
Cancel
To stop a job, use scancel and the relevant job ID,
for example: scancel 342552
GPU job
If you are new to GPUs, please complete our GPU tutorial.
This will remove your GPU restrictions, becoming able to use the modern GPUs in the gpu-ada queue.
Responsible use
GPUs are a popular but limited resource, so please take extra care to ensure you use them responsibly and efficiently.
1) Be sure your program is using the GPU resources.
Test in an interactive job, monitoring with nvidia-smi program.
We have plans for batch jobs to also report GPU utilisation, but for now only nvidia-smi can.
2) Request an appropriate amount of GPU resources.
Assess how much GPU memory your work needs - our gpu-turing GPUs have half memory of gpu-ada and usually less busy.
To submit a job to our GPU node you need to specify two additional parameters - the gpu partition and the number of GPUs you need using the --gpus argument.
Confirm your job has been given gpu devices with scontrol:
$ scontrol show job $JOBID
   ...
   TresPerJob=gres:gpu:1
CUDA software
CUDA driver 12.2 is preinstalled in each GPU node.
To load CUDA libraries and compilers then simply load one of our CUDA modules: module load cuda
Note: our CUDA module is a renamed NVIDIA HPC SDK toolkit. This is: CUDA library + NVIDIA compilers + math libs + comm libs. These NVIDIA compilers may not compile your particular software. The clue will be errors like:
nvc-Error-Unknown switch: -fwrapv
To revert to normal compilers:
unset CC CXX FC F90 F77 CPP
For all our NVIDIA modules, run module load NVIDIA-all.
This loads: CUDA, cuDNN, NCCL, and RAPIDS.
Troubleshooting
requeued in held state
If we need to urgently reboot a cluster node where you have a job running, as this will interrupt your job then we attempt to requeue it. And to give you a chance to review input/output files before job restarts, we requeue into a held state:
$ squeue --format="%j, %i, %T, %r" | column -s, -t
NAME        JOBID     STATE     REASON
norm_ctcf   3065092   PENDING   job requeued in held state
To remove the holding state, just run: scontrol release 3065092
Performance
CPUs
Take care to ensure that the number of threads/processes your software launches does not exceed the requested CPUs.
Nothing prevents this, and what will happen is your threads/processes compete for the insufficient CPUs allocated,
causing severe performance degradation as they continously interrupt each other.
Your job script can easily discover how many CPUs it has with nproc e.g.:
$ nproc
4

$ MY_NCPUS=$(nproc)
$ echo "My job has been given $MY_NCPUS CPUs"
My job has been given 4 CPUs
Storage
In addition to Ceph storage, each Slurm job has access to 30TB of local storage within each CPU node.
This is called scratch as it is intended for temporary data,
so ideal for your pipeline to store intermediate files.

Moving your intermediate files to scratch provides two advantages. Project quotas do not apply to scratch, just be aware you may be sharing the 30TB with other jobs. And the cache layer means for most cases, file operations will complete much faster than Ceph. Moving to scratch also reduces congestion in Ceph. Just remember to store your final data in Ceph before job ends.
Scratch access is managed by Slurm - each Slurm job is given a private folder for the duration of the job.
We use Linux & Slurm features to map this private folder to /tmp,
so that your jobs simply have to access folder /tmp instead of Ceph.
(Before we enabled the remap, you had to reference variable $TMPDIR which pointed to somewhere in /var/scratch/$user/)
To help explain, consider this example:
-
what your job sees:
echo "hello world" > /tmp/hello-world.txt $ ls /tmp hello-world.txt $ echo $TMPDIR /tmp/ -
where file really is:
$ sudo ls /var/scratch/slurm-tmpfs/imm-wn7/3088789/.3088789
hello-world.txt
When your job ends, Slurm automatically deletes the folder.
Job profiling
You have two tools for reviewing how efficiently your jobs use the requested resources.
-
reportseffprovides a quick broad summary:JobID State Elapsed NCPUS CPUEff ReqMem MemEff xxxxxxx COMPLETED 00:16:19 10 19.7% 100G 58.0% ... -
charts in job logs showing resource use over time
                    CPU (cores)
  8 +----------------------------------------------------+
  6 |-+             ########                           +-|
  5 |-+       ######        #####                      +-|
  4 |-+     ##                   ###########           +-|
  3 |-+   ##                                ########   +-|
  2 |-+  #                                          #  +-|
  1 |-+ #                                            # +-|
    |#     +    +   +    +    +    +    +     +    + #   |
  0 +----------------------------------------------------+
    0      10   20  30   40   50   60   70    80   90  100
                               Job profiling step
Please review our in-depth guide to job profiling.
Advanced
Job arrays
If you find yourself in the situation of running the same processing on many data files,
then consider a Slurm job array.
This is a single Slurm script that launches many jobs,
and the new Bash variable SLURM_ARRAY_TASK_ID helps you direct each to its data.
This helps you organise, and helps Slurm manage its queue.
#!/bin/bash
#SBATCH --array=0-9%2      # 10 jobs total, 2 can run concurrently
#SBATCH --ntasks=1
#SBATCH --cpus-per-task=2

#SBATCH --mem-per-cpu=10G  # 10G memory per CPU = 20G total for job

# New variable '$SLURM_ARRAY_TASK_ID' is number 0 -> 9
process ./input_$SLURM_ARRAY_TASK_ID --output ./out_$SLURM_ARRAY_TASK_ID
If you know that different jobs in array have different resource requirements, and which they are, then you can fine-tune resources when submitting. Example:
-
give first two jobs more memory (overrides contents of
my-array.sbatch):sbatch --array=0-1%2 --mem-per-cpu=40G my-array.sbatch -
launch the rest of array:
sbatch --array=2-9%2 my-array.sbatch
Our Slurm is configured with two limits that you may encounter when submitting 1000s of jobs:
MaxArraySize = 50,000- maximum size of a single job arrayMaxJobCount = 100,000- maximum number of jobs that can exist in Slurm's 24-hour memory
Slurm's memory is not just active + pending jobs in the queue, but also recently-completed jobs.
This gives Slurm the information it needs to prioritise light users over heavy users.
If you submit many jobs that would exceed MaxJobCount then you will see this message:
sbatch: error: Slurm temporarily unable to accept job, sleeping and retrying
The solution is to submit fewer, or to wait for Slurm to flush old entries from its 24-hour memory.
Job dependencies
If you have a pipeline with very different resource requirements over its lifetime - e.g. many CPUs at start then lots of memory at end - you can use a Slurm job dependency to split your one job into several linked sub-jobs. Here is a very simple example:
Pipeline stage 1 job
#!/bin/bash
#SBATCH --job-name=stage1
#SBATCH --time=01:00:00
#SBATCH --cpus-per-task=20
#SBATCH --mem=20G
#SBATCH --partition=short
echo "First job started running at `date`"
sleep 20
Pipeline stage 2 job
#!/bin/bash
#SBATCH --job-name=stage2
#SBATCH --time=01:00:00
#SBATCH --cpus-per-task=2
#SBATCH --mem=100G
#SBATCH --partition=short
echo "Second job started running at `date`"
sleep 5
Submit the first job and capture the assigned job ID. Then pass the job ID to Slurm when submitting the second job. The second job will not begin until after the first has finished.
jid=$(sbatch job1.sbatch | awk '{print $4}')
sbatch --dependency=$jid job2.sbatch
squeue
             JOBID PARTITION     NAME     USER ST       TIME  NODES NODELIST(REASON)
           1924250     short   stage2 aowenson PD       0:00      1 (Dependency)
           1924249     short   stage1 aowenson  R       0:03      1 imm-wn7
As each job can run on a different cluster node,
do not rely on transferring data via TMPDIR because it is not synchronised between nodes
(and also it is automatically deleted at end of job).